|
Running App Professional 1
V6.6.1
for Garmin ConnectIQ-Compatible Devices
|
|
Running App Professional 1
V6.6.1
for Garmin ConnectIQ-Compatible Devices
|
This section describes everything you need to know to get Running App Professional 1 up and running on your Garmin device.
Topics:
Please install the Running App Professional 1 application by downloading it from the Garmin App Store via the Garmin Express Software on PC/MAC or via the Garmin Mobile app on your mobile phone.
Here a YouTube video describing the installation process:

The Running App Professional 1 in the PREMIUM version offers a huge amount of configuration options which can be changed on your PC/MAC your or on your mobile phone:
All configurations can be changed on your PC or MAC by using the Garmin Express Software. Before changing configurations, please make sure that you have installed the latest software version. The software can be downloaded from the official Garmin web site.
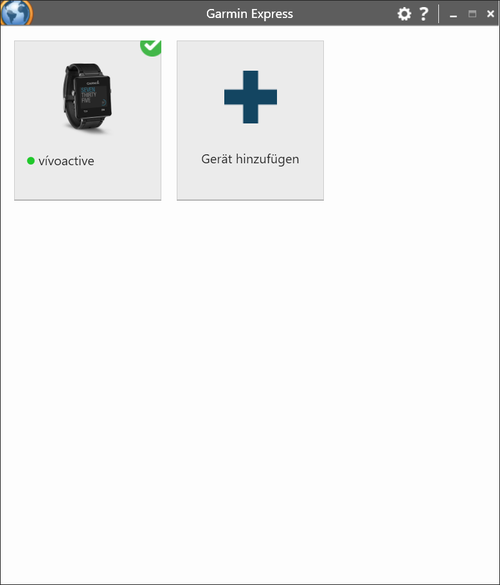
Step 1: Start Garmin Express Software Look for the symbol as shown below and double-click it to start the Garmin Express software.
After that you should be able to see your Garmin device as shown in the picture below. If not, please add your device first. For details refer to the documentation provided by Garmin.

Step 2: Establish Connection between PC/MAC and the Garmin Device Connect your device via USB to your PC/MAC. Your device should be automatically detected and the Garmin Express software starts a synchronization process. When everything is ok, it is signalized via green lights as shown in the figure below. In case problems occur, please refer to the documentation provided by Garmin.
Step 3: Select Device Please click on the icon which shows your device. Following picture should appear:
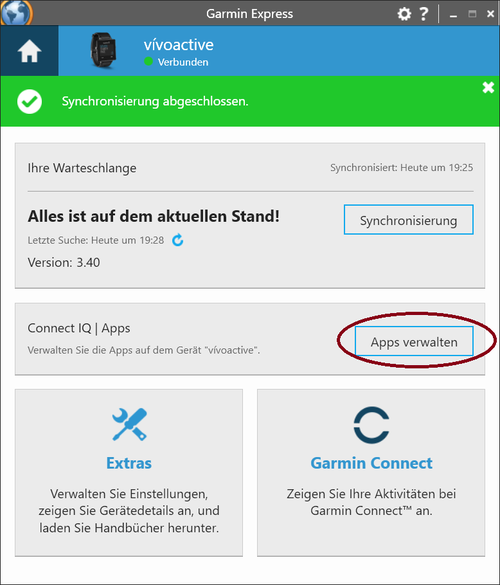
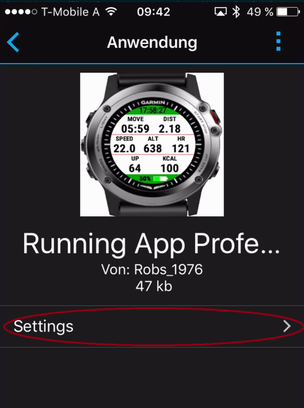
Step 4: Find our Apps Please click the marked button in the picture above. A list of all installed applications on your device should appear. Please scroll up/down until you find the application you would like to configure as shown in the figure below:
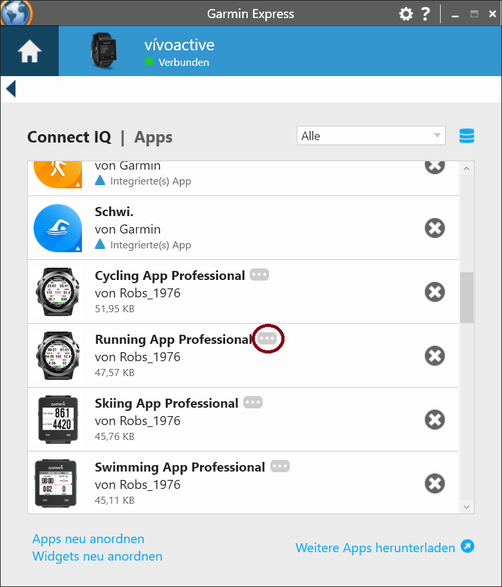
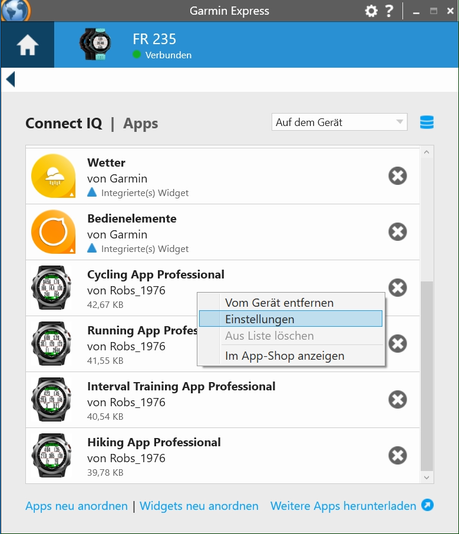
Step 5: Select App for Configuration Please select the application you would like to configure by clicking with the left mouse button to the three dots as marked in the left picture above to the app of your choice as shown in the right picture above. A context menu will be shown where you have to select "Settings"
Following screen should appear:
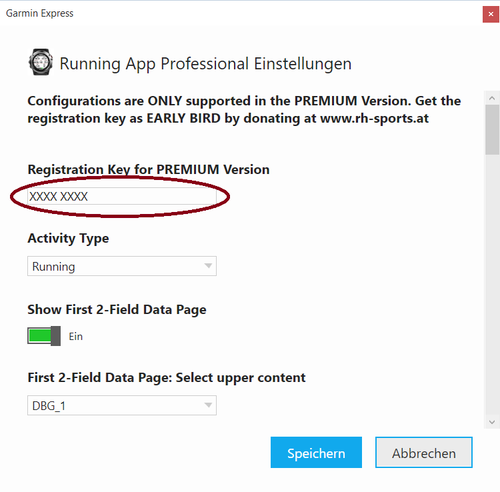
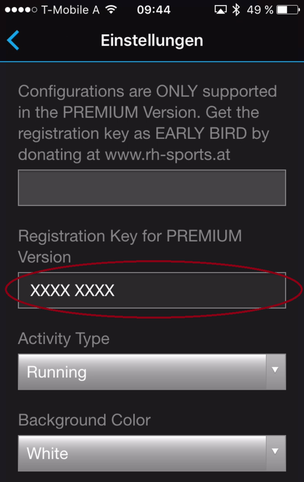
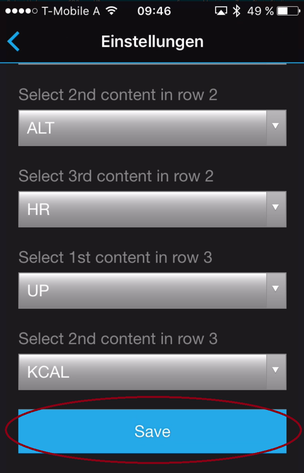
Step 6: Change Configuration Please note that configuration changes ONLY apply on your Garmin device if you have entered the proper PREMIUM key in the field marked in the picture below. The key consists of two times four characters separated by a space in between. If the proper key is entered, please make the configurations according to your needs and press the "Save" button at the end. The Garmin Express Software will update the configurations on your device. In case of errors, please refer to the documentation provided by Garmin.
Step 7: Disconnect Device After the configuration changes were saved, disconnect your device from the PC/MAC.
Step 8: Start Application on Device Please start your application on your Garmin device. If you have the PREMIUM Version (key was correct), then your configuration changes should have been applied. If not, please refer to our Frequently Asked Questions.
All configurations can be changed on your mobile phone by using the Garmin Connect(TM) Mobile app which is available for Android-, iOS- and Windows-compatible devices. Before changing configurations, please make sure that you have installed the latest app version. The app can be downloaded from the appropriate App Store (e.g. Google Play, Apple Store, etc.)
Step 1: Start Garmin Connect Mobile App Look on your mobile phone for the app with the symbol shown on the left side and click it to start the Garmin Connect™ Mobile app.
A similar window as shown below should appear.
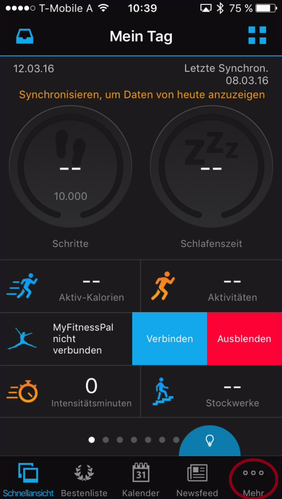
Step 2: Look for Garmin Devices List After pressing the button with the dots on the lower right side (as marked above) a new windows appears. Please scroll down until you find the entry "Garmin Devices".
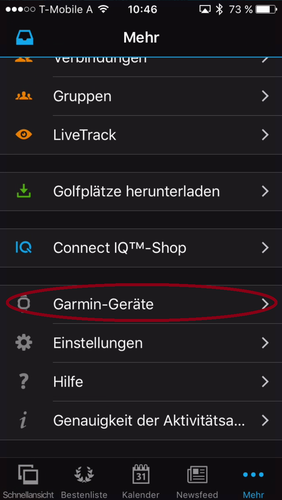
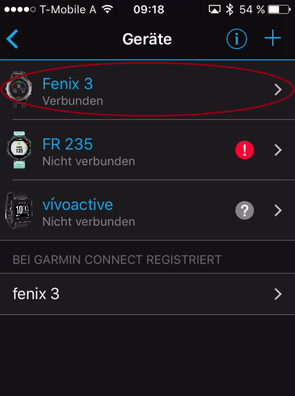
Step 3: Select your Garmin Devices After pressing the button marked above, a window with all your registered Garmin devices appears (see picture below). If you cannot find your device, please add it before by clicking on the upper right "+" sign. For further details, please refer to the documentation offered by Garmin. Then select one of your connected device.
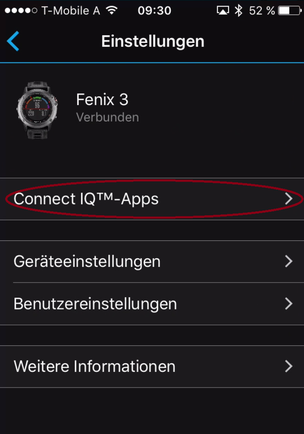
Step 4: Select Activities and Apps Please click the marked button in the picture below following by clicking to applications.
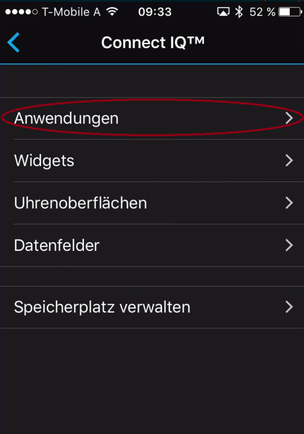
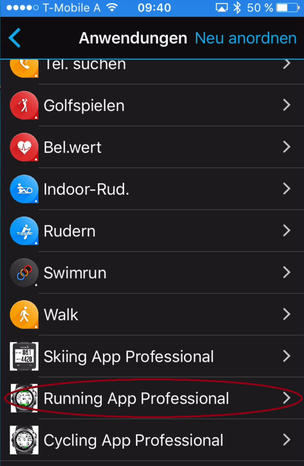
Step 5: Select an Application for Configuration A list of all applications appear. Please scroll up/down until you find the application you would like to configure as shown in the figure below:
Step 6: Select Settings Please click on Settings as marked below.
Step 7: Change Configuration Please note that configuration changes ONLY apply on your device if you have entered the proper PREMIUM key in the field marked in the picture below. The key consists of two times four characters separated by a space in between. If the proper key is entered, please make the configurations according to your needs.
Step 8: Save Configurations Finally scroll down and press the "Save" button. The Garmin Mobile App will update your configurations on your device. In case of communication errors, please refer to the documentation provided by Garmin.
Step 9: Start Application on Device Please start your application on your device. If you have the PREMIUM Version (key was correct), then your configuration changes should have been applied. If not, please refer to our Frequently Asked Questions.
This section describes how to start Running App Professional 1 on your Garmin device.
After installation the downloaded Running App Professional 1 application can be found on the Garmin Watch by pressing the “Start" Button. Search for following icon and select it to start the application:
The application start process runs through following phases:
Phase 1:
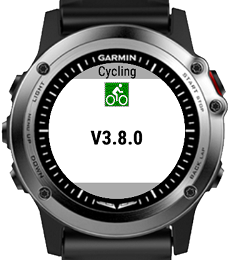
In this phase the About screen with version information is shown for ~2 seconds (FREE version) respectively ~1 second (PREMIUM version). This phase cannot be aborted. On a D2™ Bravo is looks like that:
Phase 2:
In this phase information about your registration status is shown for ~6 seconds (FREE version). In the PREMIUM Version this screen is omitted for faster startup. This phase cannot be aborted. On a D2™ Bravo is looks like that:

Phase 3:
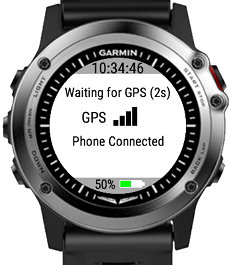
In this phase the sensor polling screen is shown as long as no proper GPS signal has been found or the timeout is reached. If a proper GPS signal is already available, then the screen is only visible for a short moment (~1 second). If not, then this screen is shown for at most ~35 seconds. During this phase the "BACK" button can be used to abort the polling sequence. On a D2™ Bravo is looks like that:
Phase 4:
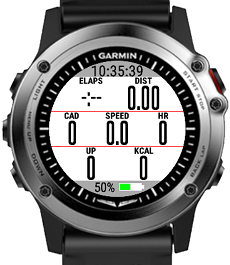
The application startup process is finished and the application can be used. On a D2™ Bravo it looks like that:

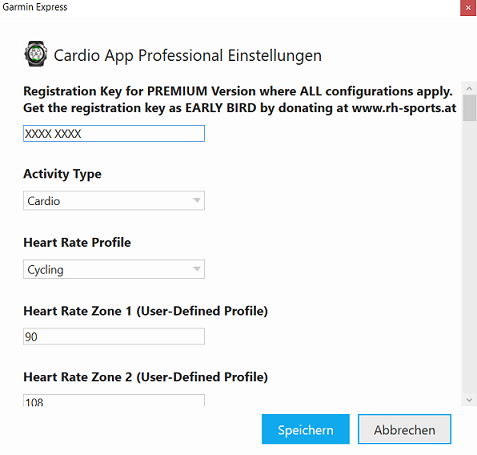
| Most configuration changes are ONLY possible in the PREMIUM version. Please donate first to get the registration key. |
After successful donation you receive a mail with the PREMIUM activation key(s). Please copy the registration key exactly in the given format (XXXX XXXX) into this text field. The registration key evaluation is case sensitive and no spaces are allowed at the beginning or end. One space is mandatory after the fourth character.

Here some important registration hints:
Hint 1: Please copy the registration key with 9 characters length exactly in the given format (XXXX XXXX) into this text field. The registration key is a hexadecimal number (numbers from 0 to 9 and big letters from A to F) and the evaluation is case sensitive. No spaces are allowed at the beginning or end. One space is mandatory after the fourth character.
Hint 2: Users reported that on some devices (e.g. Android-based mobile phones) more than one space is added when copying the key to the app settings field. Please make sure that there is exactly one space after the fourth character.
Hint 3: Please synchronize the settings with your watch afterwards. If you use Garmin Express software on PC or MAC, please disable the bluetooth connection between your mobile phone and watch during configuration as otherwise the settings might be overwritten again.
Hint 4: Sometimes it is necessary to reboot the watch once (for whatever reason).
Hint 5: Please use the right key for the selected application or data field.
Hint 6: Please make sure that there are no floating point values in the app settings anymore (except for Swimming App where they are allowed).
This option allows you to select among different activity types. Depending on your selection the session data will be categorized. Please note that this configuration has to be done before manually starting a session the first time.
Following options are available:
This option allows you to select the satellite configuration. Following options are available on devices with CIQ 3.2 and higher:
The sensor page shows you the information of the satellite configuration which is currently used. For further details about the satellite quality, please refer to here.
Please be aware that disabling satellites (GPS off) may have following impacts:
This option allows you to configure the averaging period in seconds for instant pace and cadence averaging. If you e.g. would like to have PACE averaged over the last 10 seconds, then please set the value to 10. The PACE xs data field shows this information. With longer averaging periods, the shown values are more stable but also lazier.
This option allows you to select the background and text color.
Following options are available on devices with CIQ 1:
Please refer to following picture for better illustration:
On devices with CIQ2 and higher, following extended options are available:
Please refer to following picture for better illustration:
This option allows you to configure the limit in km/h or mi/h (depending on your watch unit settings for distance) when the application switches to the auto-stop mode or leaves this mode again. A value of 0 disables the auto start/stop feature completely.
This option allows you to enable and configure the auto scroll feature (automatically cycles through data pages during workout) by entering the auto scroll time. This is the time in seconds when the application automatically scrolls to the next page.
This option allows you to configure the averaging period in seconds for instant pace and cadence averaging. If you e.g. would like to have PACE averaged over the last 10 seconds, then please set the value to 10. The PACE xs data field shows this information. With longer averaging periods, the shown values are more stable but also lazier.
The "LAP Mode" configuration option allows you to select the mode for the LAP feature. Following options are available:
For further details about the LAP features, please click here.
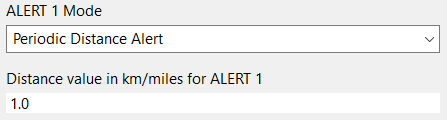
The ALERT1 Mode allows you to configure a distance alert with following options:
The ALERT2 mode allows you to configure a timer alert with following options:
The ALERT3 mode allows you to configure an alert when the heart rate, pace or cadence is below a defined limit. Following options are available:
The ALERT4 mode allows you to configure an alert when the heart rate, pace or cadence is above a defined limit. Following options are available:
For further details about the alert features, please click here.
This option allows you to enable the background light during the whole workout session for better readability in dark environments.
This option allows you to enable the data field coloring feature. For further details, please click here.
This option allows you to select upon following different ANT+ sensors:
Please configure this setting before starting the workout session as otherwise changes are ignored.
This option allows you to select whether data pages shall be visible or not to have a better overview about your really needed information.
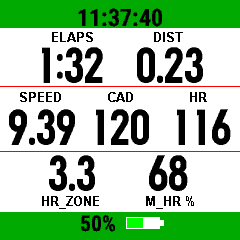
This option allows you to freely select the content of all 2-field data pages out of a huge list of all available data fields (even during the ongoing training session). This enables you to adjust all fields completely according to your personal preferences.
For an overview of available data fields, please click here!
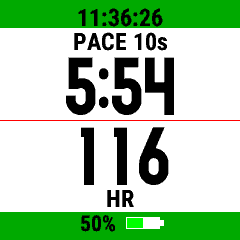
This option allows you to freely select the content of all 4-field data pages out of a huge list of all available data fields (even during the ongoing training session). This enables you to adjust all fields completely according to your personal preferences.
For an overview of available data fields, please click here!
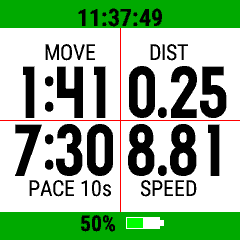
This option allows you to freely select the content of the 7-field data page out of a huge list of all available data fields (even during the ongoing training session). This enables you to adjust all fields completely according to your personal preferences.
For an overview of available data fields, please click here!
 1.8.15